Get Started with Selenium
This is a short introduction to help you set up and start using Selenium. In this write-up, we will use Selenium Client and WebDriver for Java with JUnit 5 — Selenium for web browser automation and JUnit 5 for verification and validation — thus, we will embed Selenium code in a JUnit test file. Please refer to https://junit.org/junit5/ for more information on JUnit 5 and https://www.selenium.dev for Selenium 4.(Please let me know if you find any errors or omissions in the document —Upsorn Praphamontripong, 4-January-2024)
Selenium is an open-source test automation framework for web apps. It provides a test domain-specific language allowing developers and testers to write tests in many languages such as Java and Python. Selenium relies on WebDriver, making it possible to run the same tests (with some modification) interchangeably in many web browsers.
Important note: Selenium tests run on a web browser. Whenever you update your web browser, please verify that your Selenium's browser driver supports the version of your web browser. If it does not support, you need to download and set up the browser driver. Remember to verify that their versions are compatible.
Install Java (JDK)
A Java Development Kit (JDK) includes the Java Runtime Environment (JRE) that is required to write and run Java program. If you have already installed JDK on your machine, please skip this step.
Note: this introduction uses JUnit 5 to verify the behavior of the program under test; JUnit 5 requires Java 8 or higher.
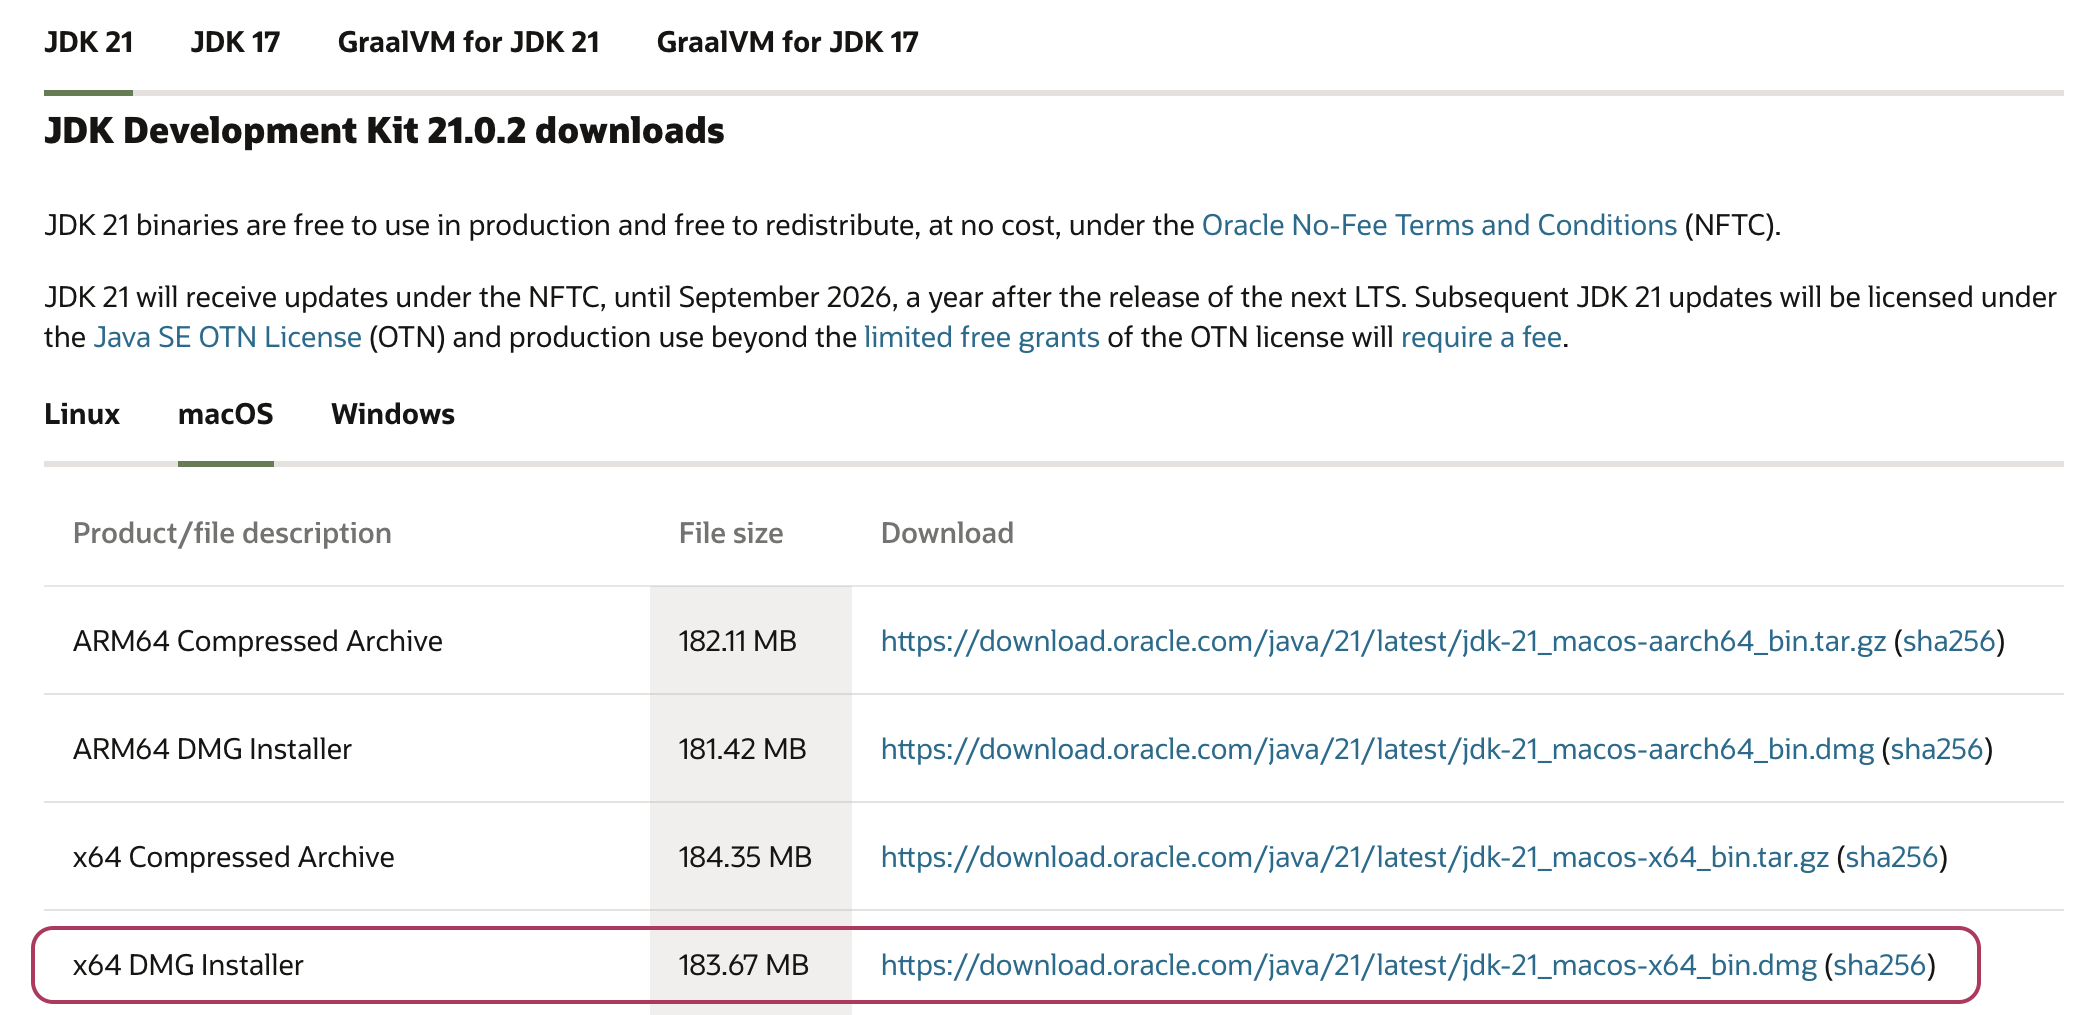
- Download Java
(https://www.oracle.com/java/technologies/downloads/) and
install it.
Depending on your operating system and how your machine is configured,
you may need to set the environment path.
Note: this introduction was created for macOS and use the installer shown below.
- Verify the installation.
Use a terminal, type
java -version. You should see a screen showing the Java version on your machine.
Install Eclipse
This introduction uses Eclipse. You may use any Java IDE of your choice and configure Selenium as appropriate. If you have already installed Eclipse (or any Java IDE), please skip this step.
- Download Eclipse (https://www.eclipse.org/downloads/) and install it. For more information on Eclipse installation, please refer to https://www.eclipse.org/downloads/packages/installer
- Verify the installation.
Double click the Eclipse executable file
 (
(Eclipse.appfor macOS,Eclipse.exefor Windows)
Note: Eclipse comes with JUnit 5. Thus, no additional set up is needed for JUnit 5.
If you use other Java IDEs, please verify if JUnit 5 is included. Many Java IDEs come with JUnit 5 (e.g., Eclipse, NetBeans, IntelliJ, and Visual Studio Code).
If you do not already have JUnit 5 on your machine, you may download JUnit 5 (https://junit.org/junit5/), use any Java IDE or command line to set up. Depending on your machine's configuration, you may need to set the environment path.
Download Selenium Client and WebDriver
This introduction uses Selenium 4. WebDriver, the core of Selenium, is an interface to write instruction sets that can be run interchangeably in many web browsers. Later, you will download and set up a web browser driver. You will then configure the browser driver through WebDriver. If you have already installed Selenium 4, please skip this step.
- Download Selenium 4 for Java.
You may download
selenium-java-4.4.0.zip
directly or download it from the official website.
https://www.selenium.dev/downloads/

- Extract the contents of the downloaded file.
You will later add all the
.jarfiles to configure Selenium WebDriver with Eclipse.
Install Web Browser Driver
The browser driver interacts with the real web browser and instructs it to execute the actions as specified in a Selenium test. Each browser requires a browser driver specific to it.
In practice, testers would run tests on multiple web browsers to ensure the program under test behaves appropriately across browsers.
Depending on which web browser(s) you use, download the appropriate browser driver(s). Please be sure to verify the version of your web browser.
Alternatively, you may download the browser driver from the following locations directly:- Chrome: https://chromedriver.chromium.org/downloads
- Firefox: https://github.com/mozilla/geckodriver/releases
Later, you will configure web browser driver through Selenium's WebDriver.
Note on some common issues:
It appears that web browsers update more often than the drivers. For simplicity, we recommend that you try not to update your web browser too often. Otherwise, you may need to re-configure your Selenium test environment or sometimes need to downgrade your web browser. Please be sure to verify that the driver for the specific version is available before updating your web browser.
Create a JUnit test file
- Launch Eclipse.
Double click the Eclipse executable file
(
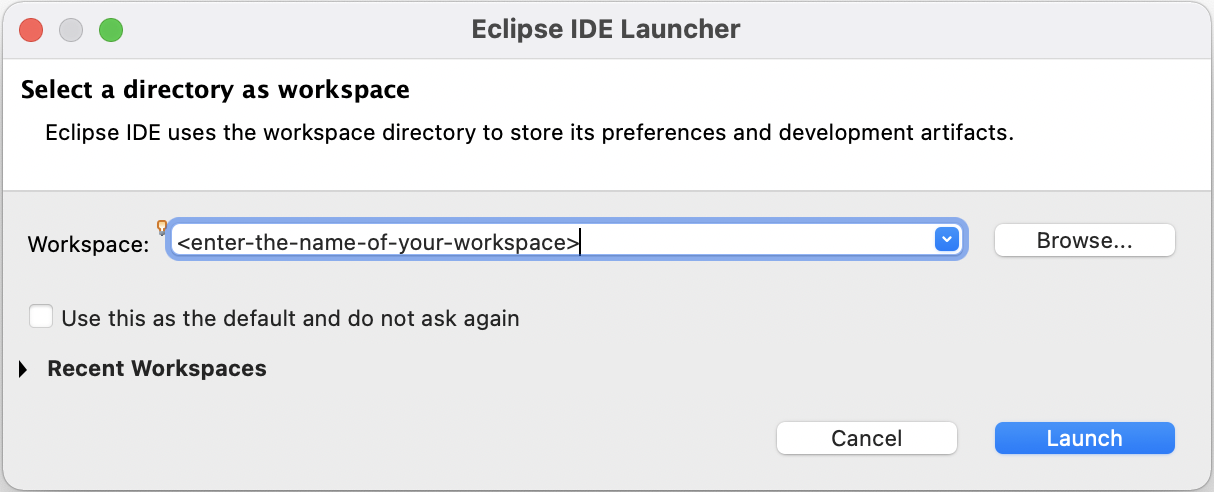
Eclipse.appfor macOS,Eclipse.exefor Windows) - Create a workspace
- Create a Java project by clicking on
File > New > Project.., selectJava Project, then enter your project name
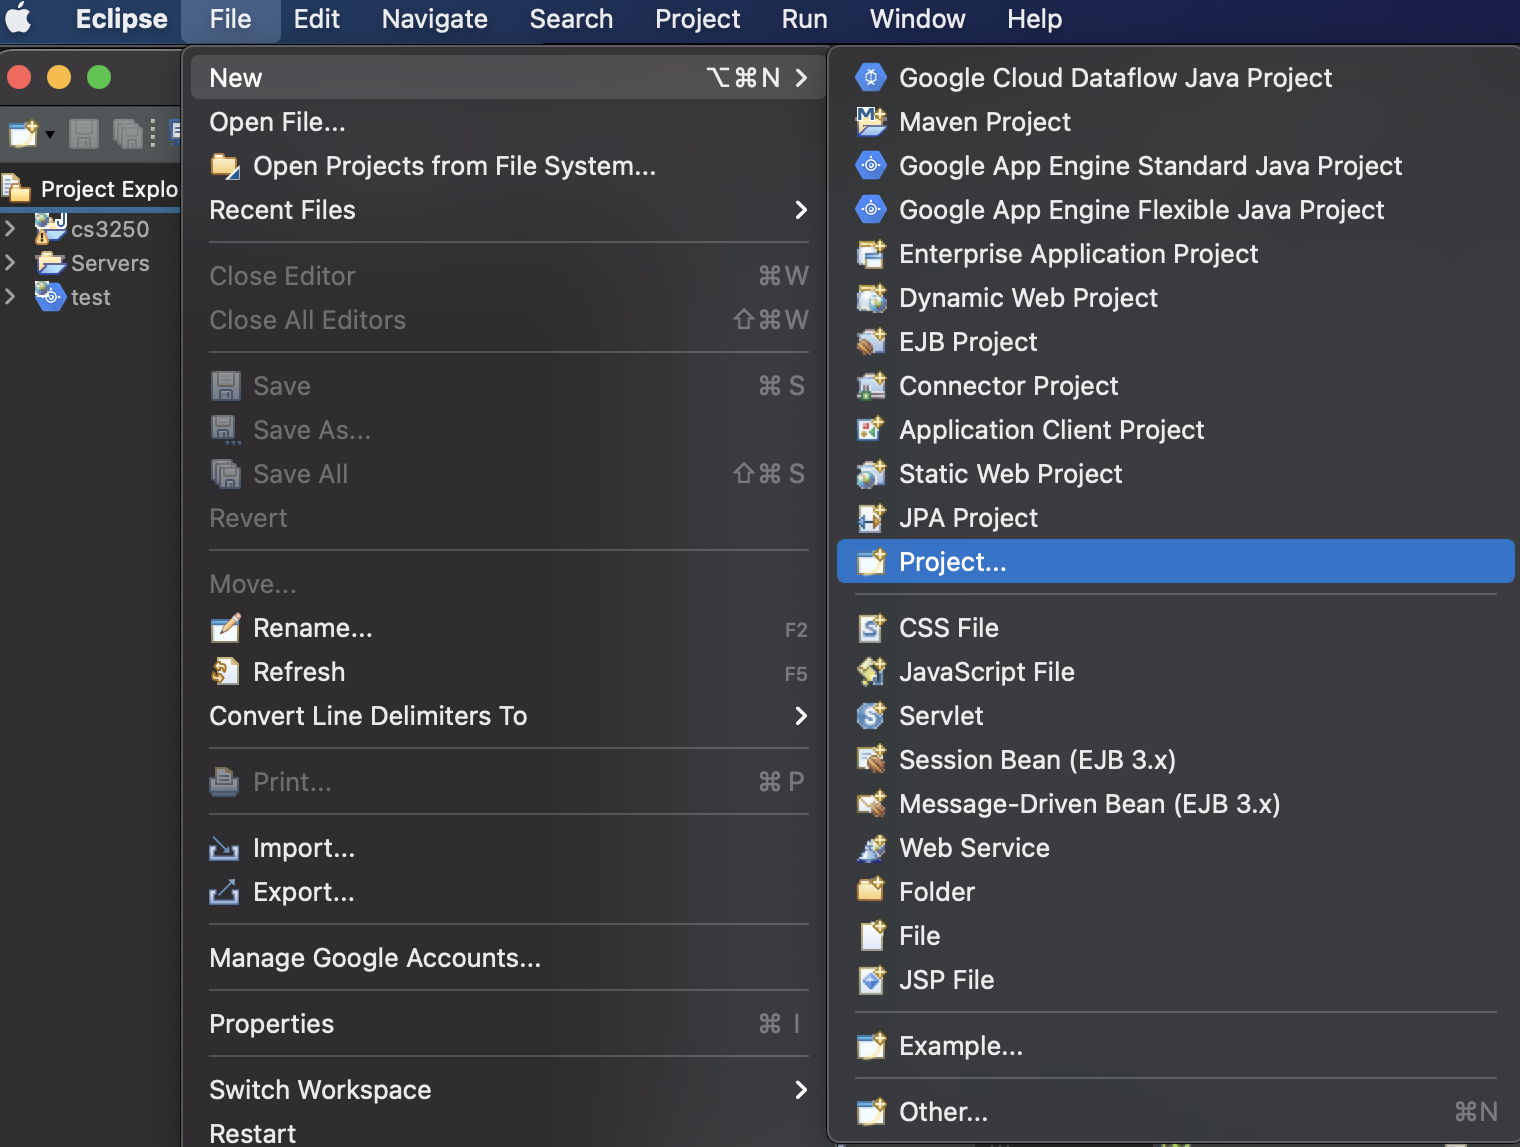
Depending on your Eclipse version and configuration,
Java Projectmay appear by default, and thus you may not need to click on theProject..option.Eclipse works in project. It is important that you first create a Java project. You will later create a Selenium test file in this project.
- Create a package under this project. Right click the
srcfolder, selectNew > Package, then enter your package name (assume the package is named "test")
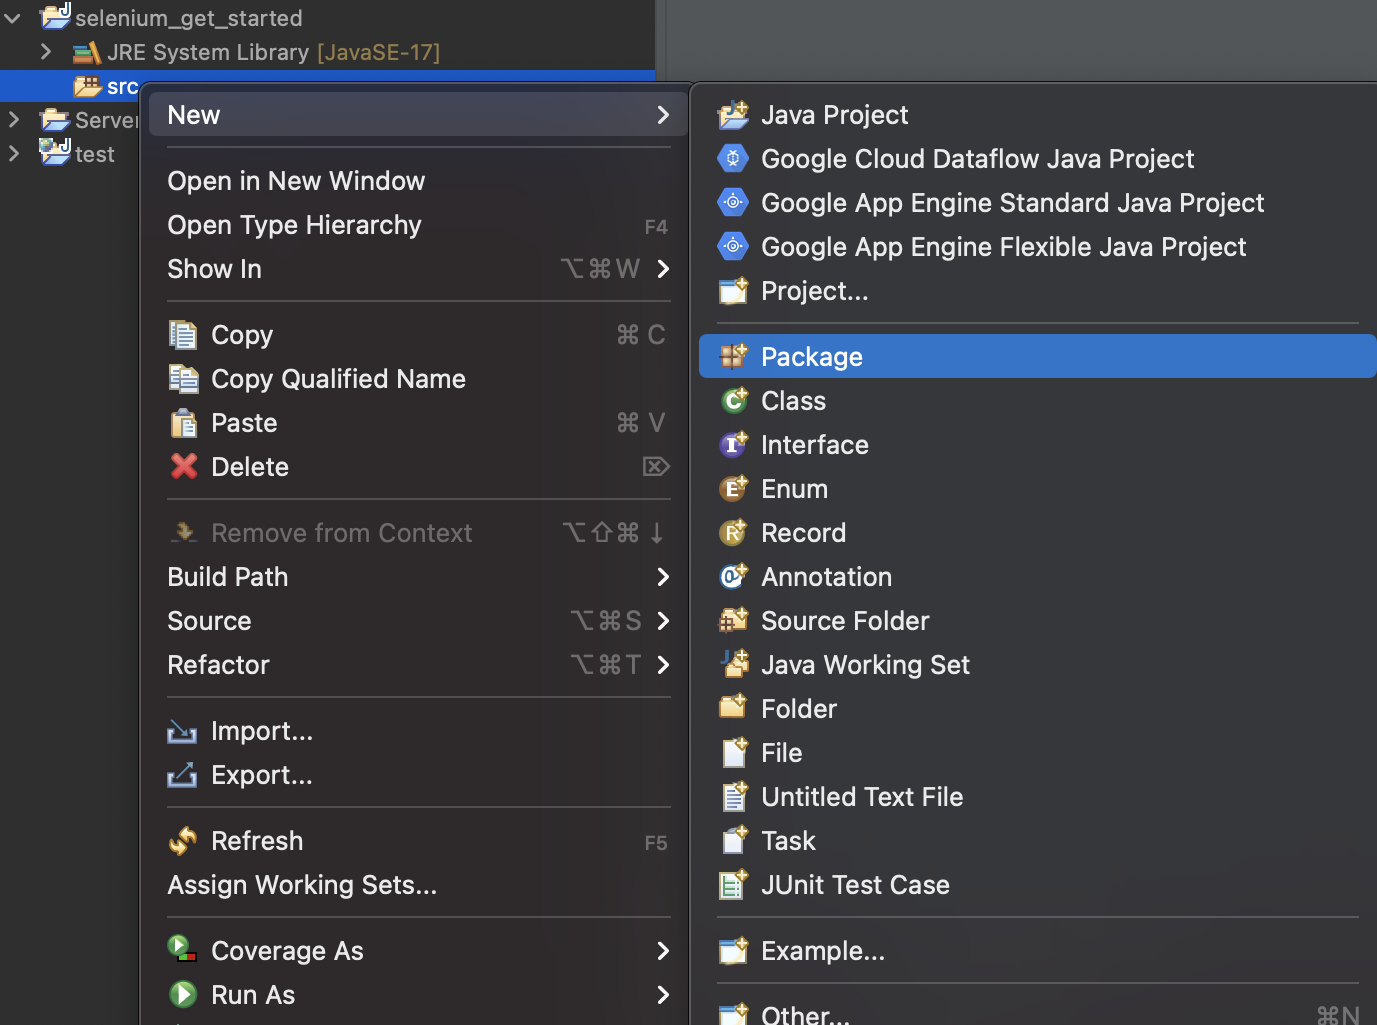
Note: a package is optional but recommended. This is to help you organize your files.
- Create a JUnit test file. Right click the "test" package,
then select
New > JUnit Test Case, enter your file name
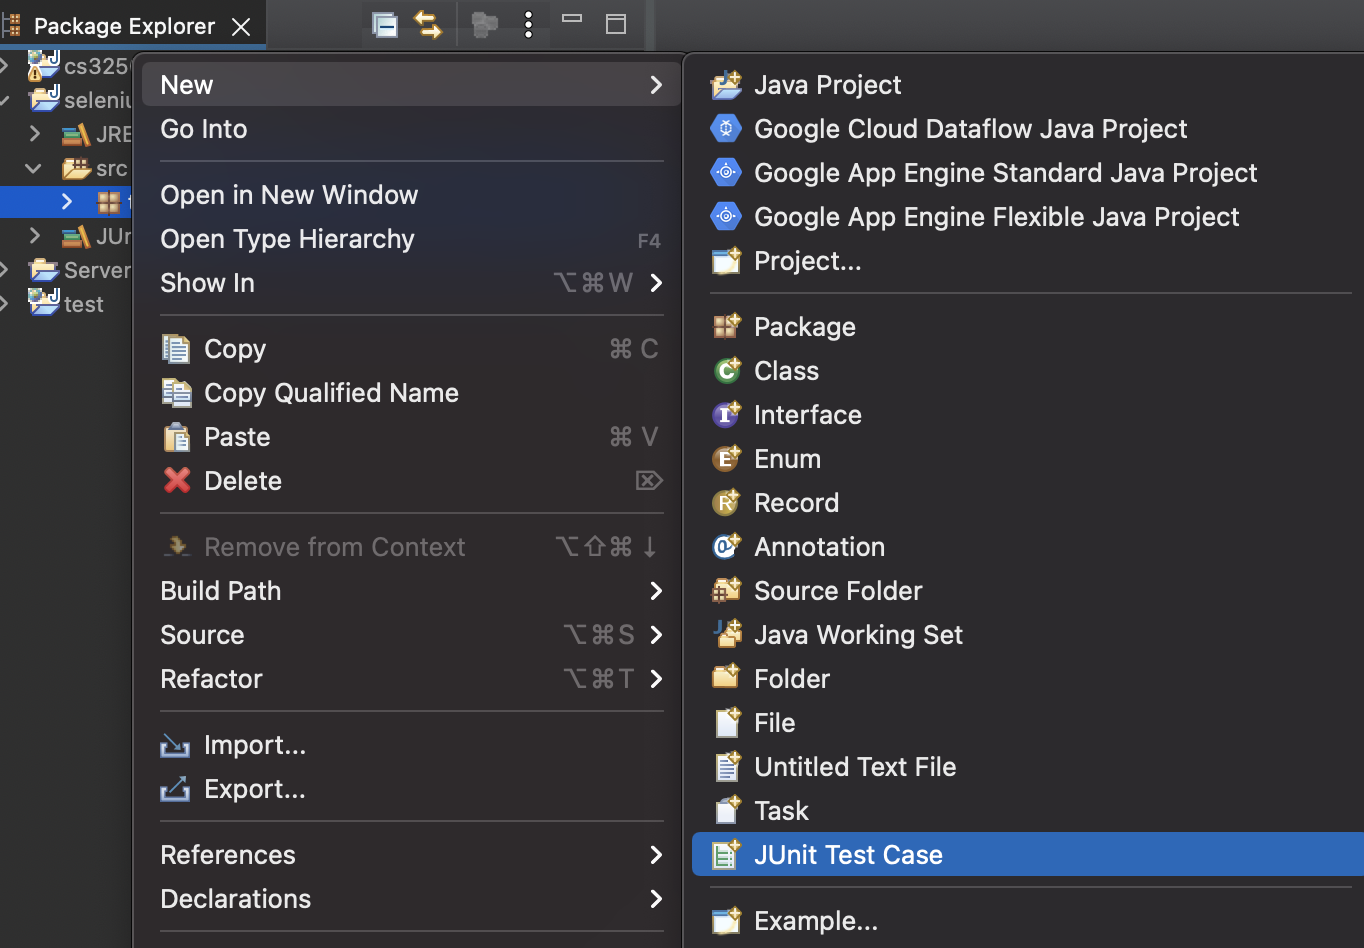
Be sure to select
New JUnit Jupiter Testto create JUnit 5 test
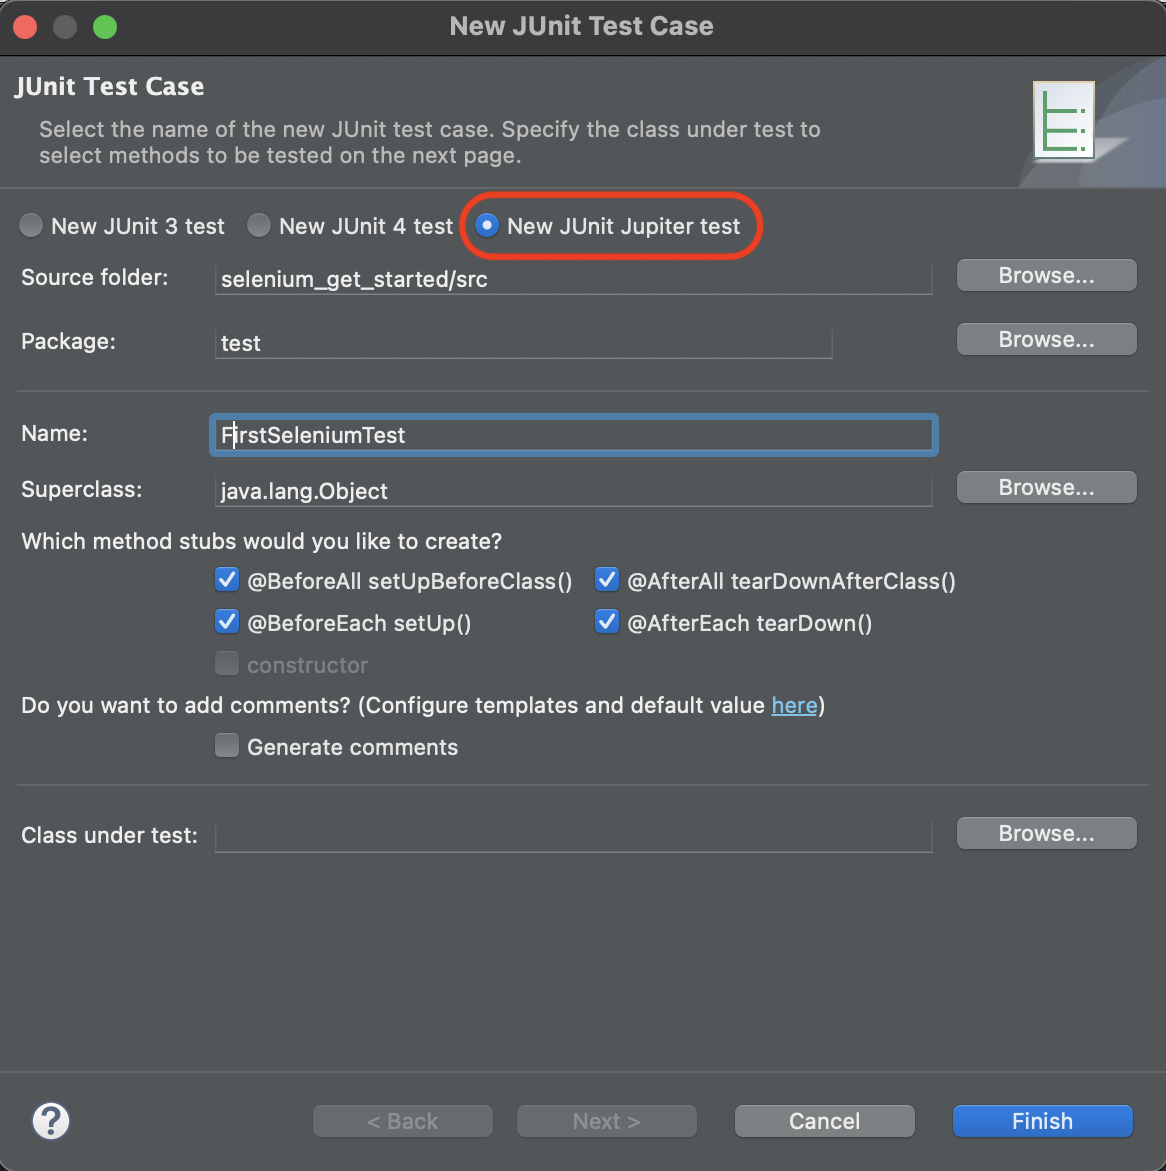
so that Eclipse will automatically add JUnit 5 library to Java Build Path of the project.
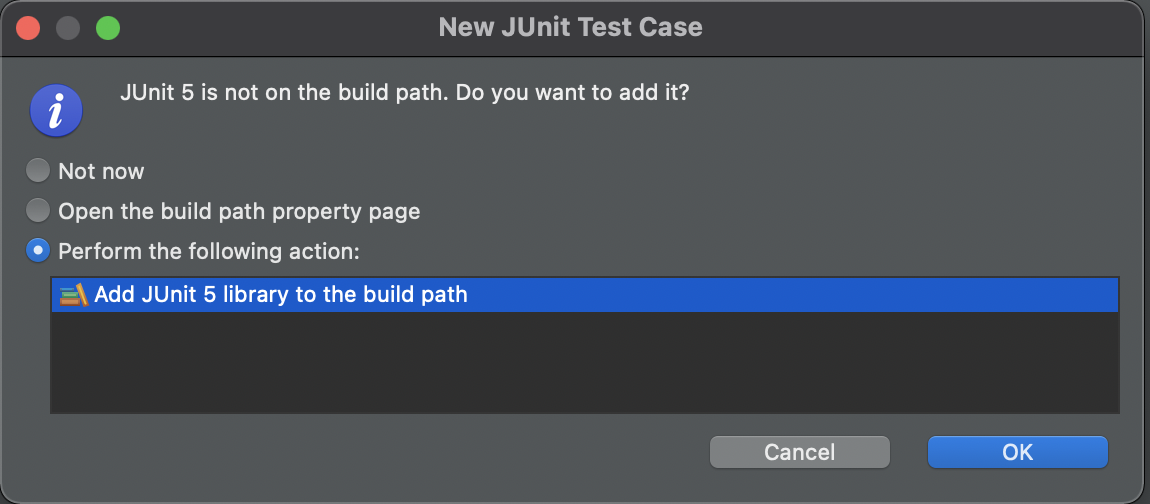
Alternatively, you may manually add JUnit 5 library to the project. Select your project, then click the
Project > Propertiesmenu.
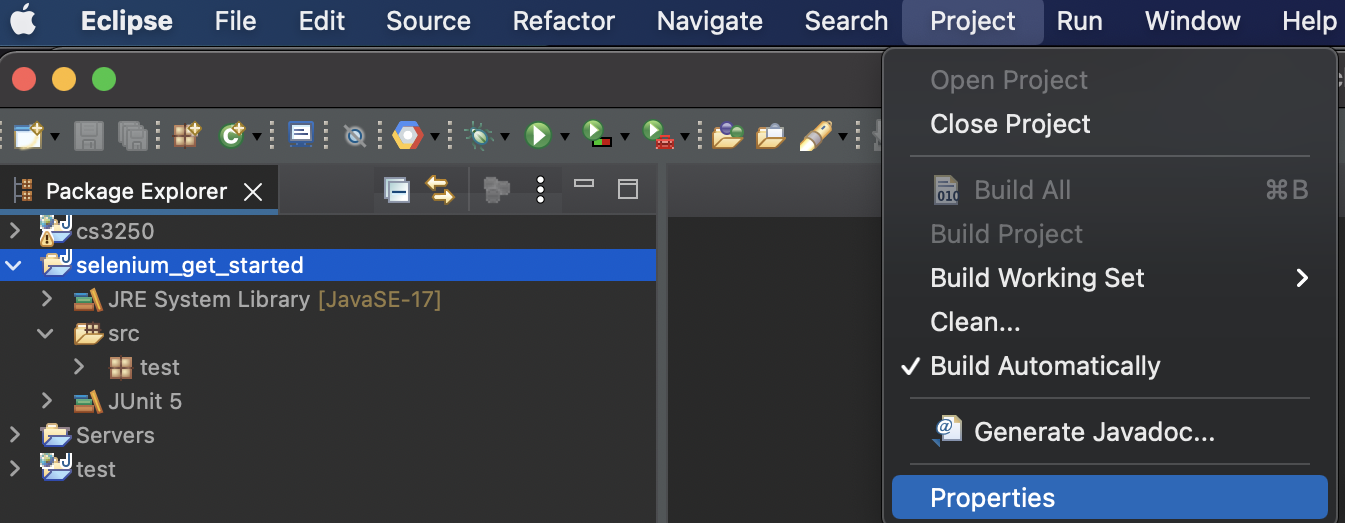
Select
Java Build Path > Libraries > Classpath > Add Library..., then selectJUnit
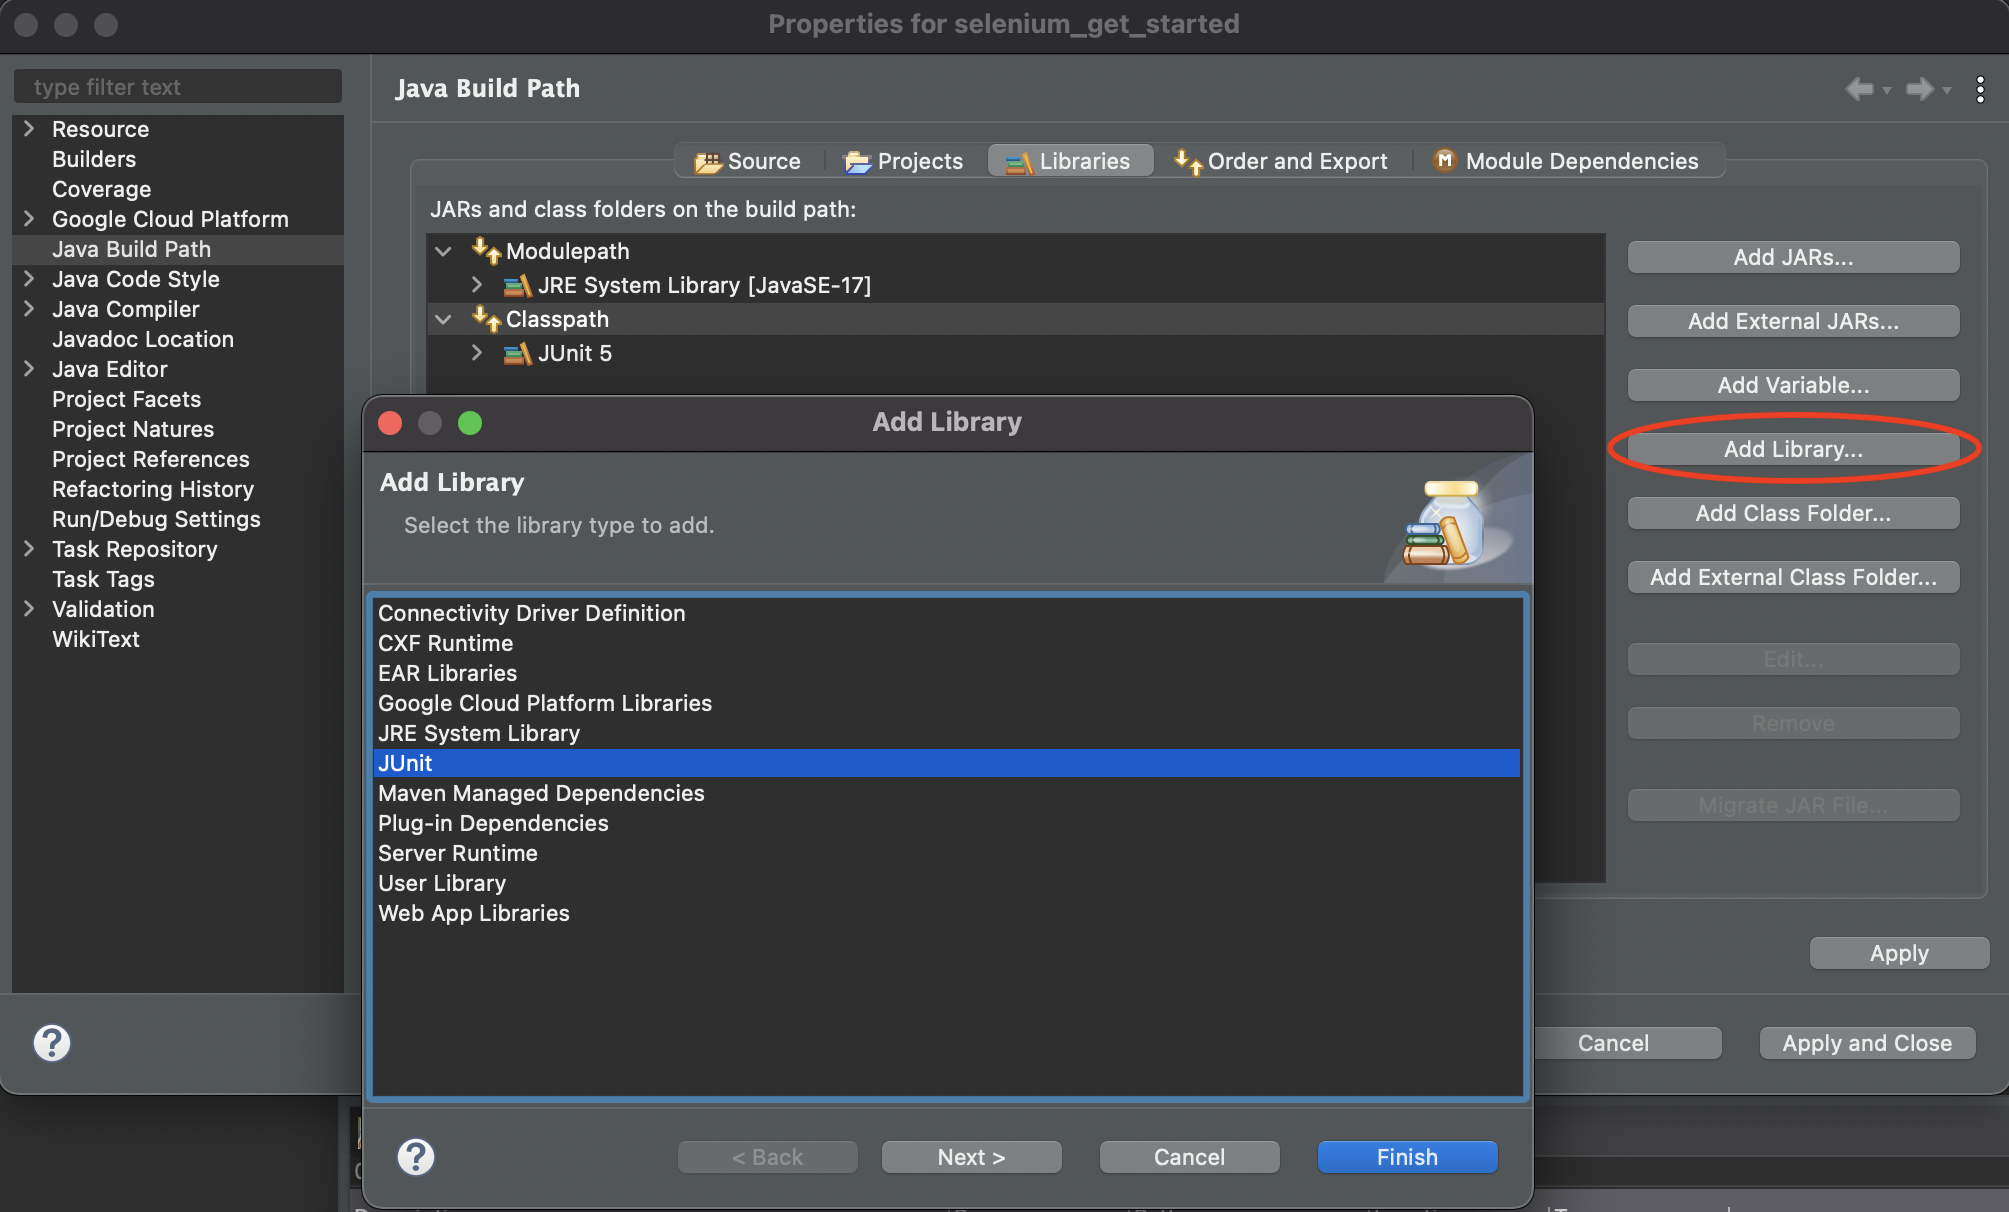
Depending on your Eclipse version, if there is no
Classpathto select, simply click theAdd Library...button.
Configure Selenium
-
Select your project, click the
Project > Propertiesmenu, then selectJava Build Path > Libraries > Classpath > Add External JARs...
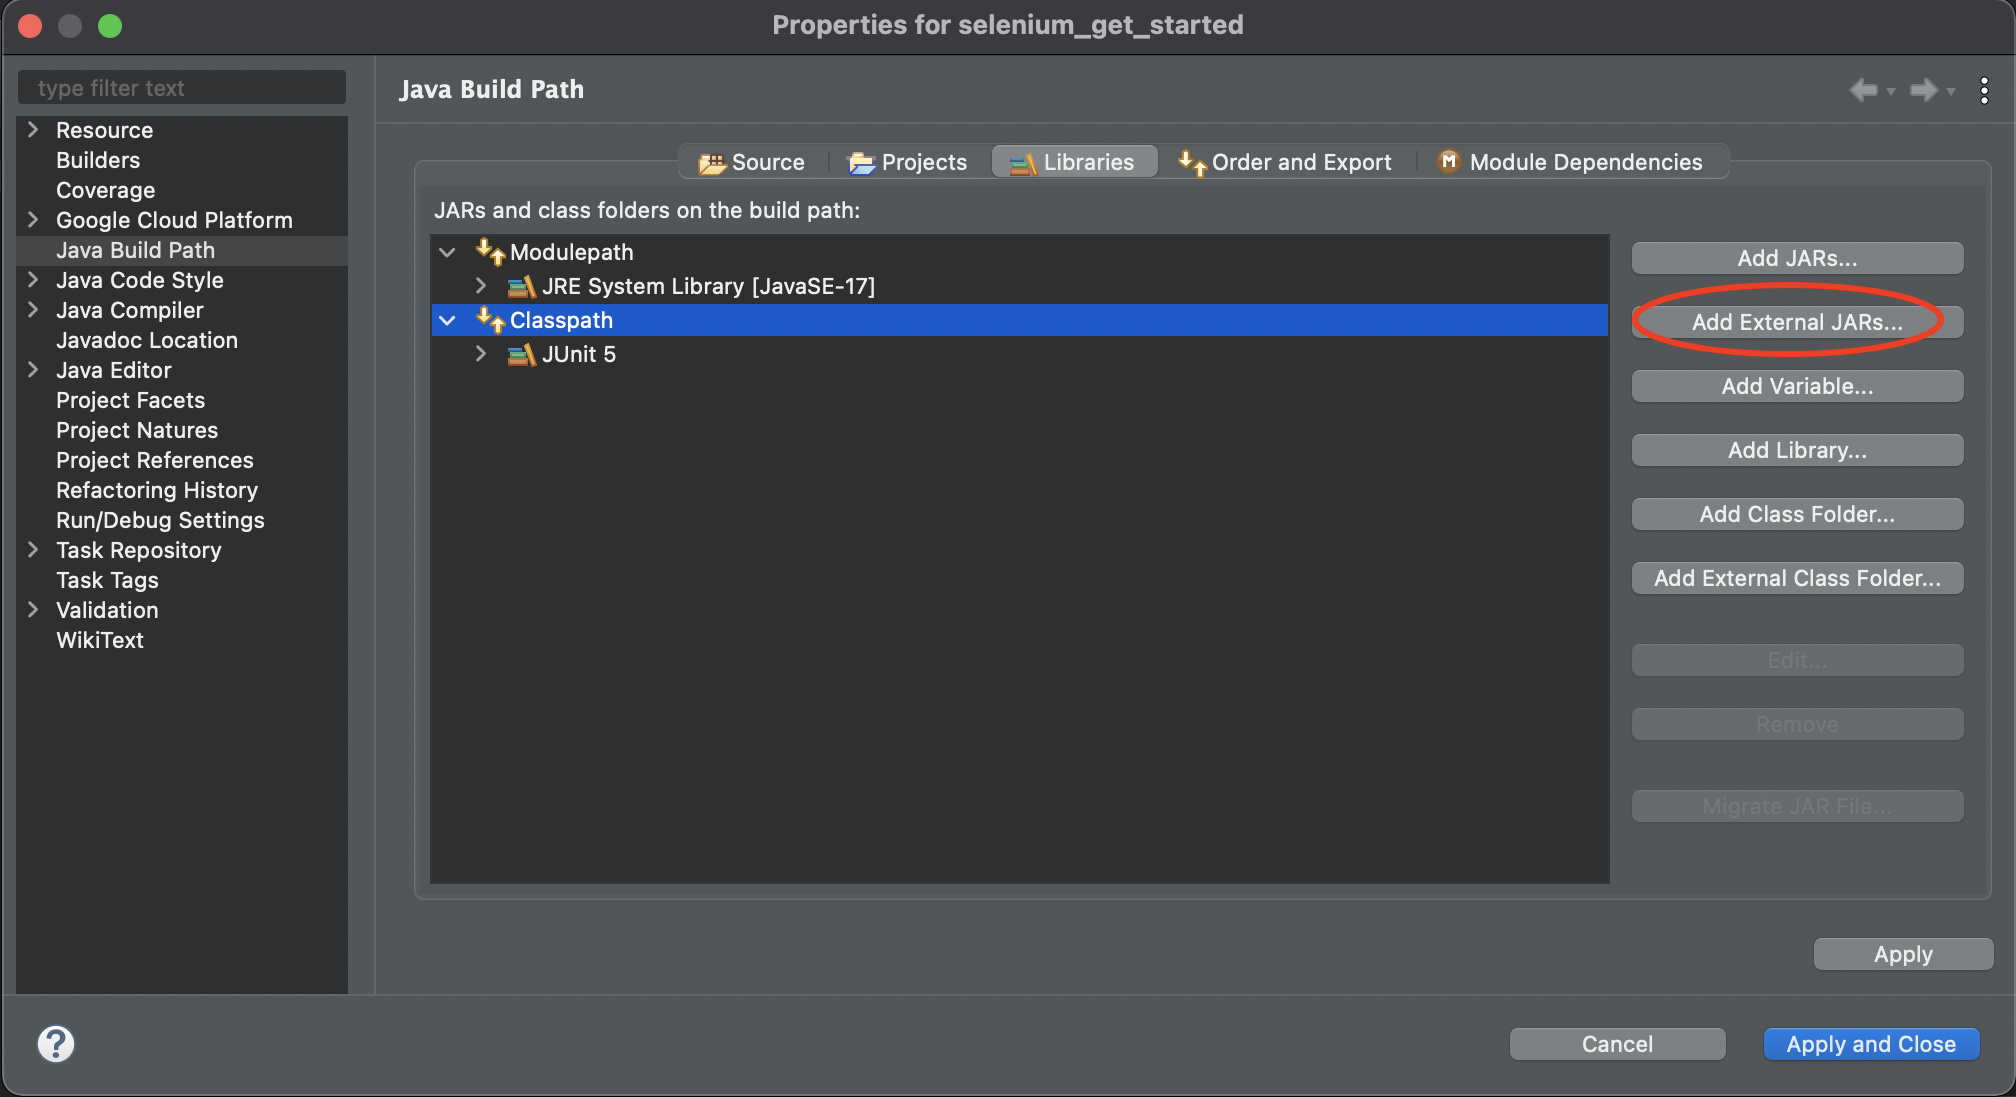
Depending on your Eclipse version, if there is no
Classpathto select, simply click theAdd External JARs...button. - Navigate to your extracted Selenium folder

-
Select all
.jarfiles and add them to the classpath. (note: make sure that they are added to the classpath, not the modulepath) You classpath should show all the.jarfiles. Be sure to clickApply and Closebutton.
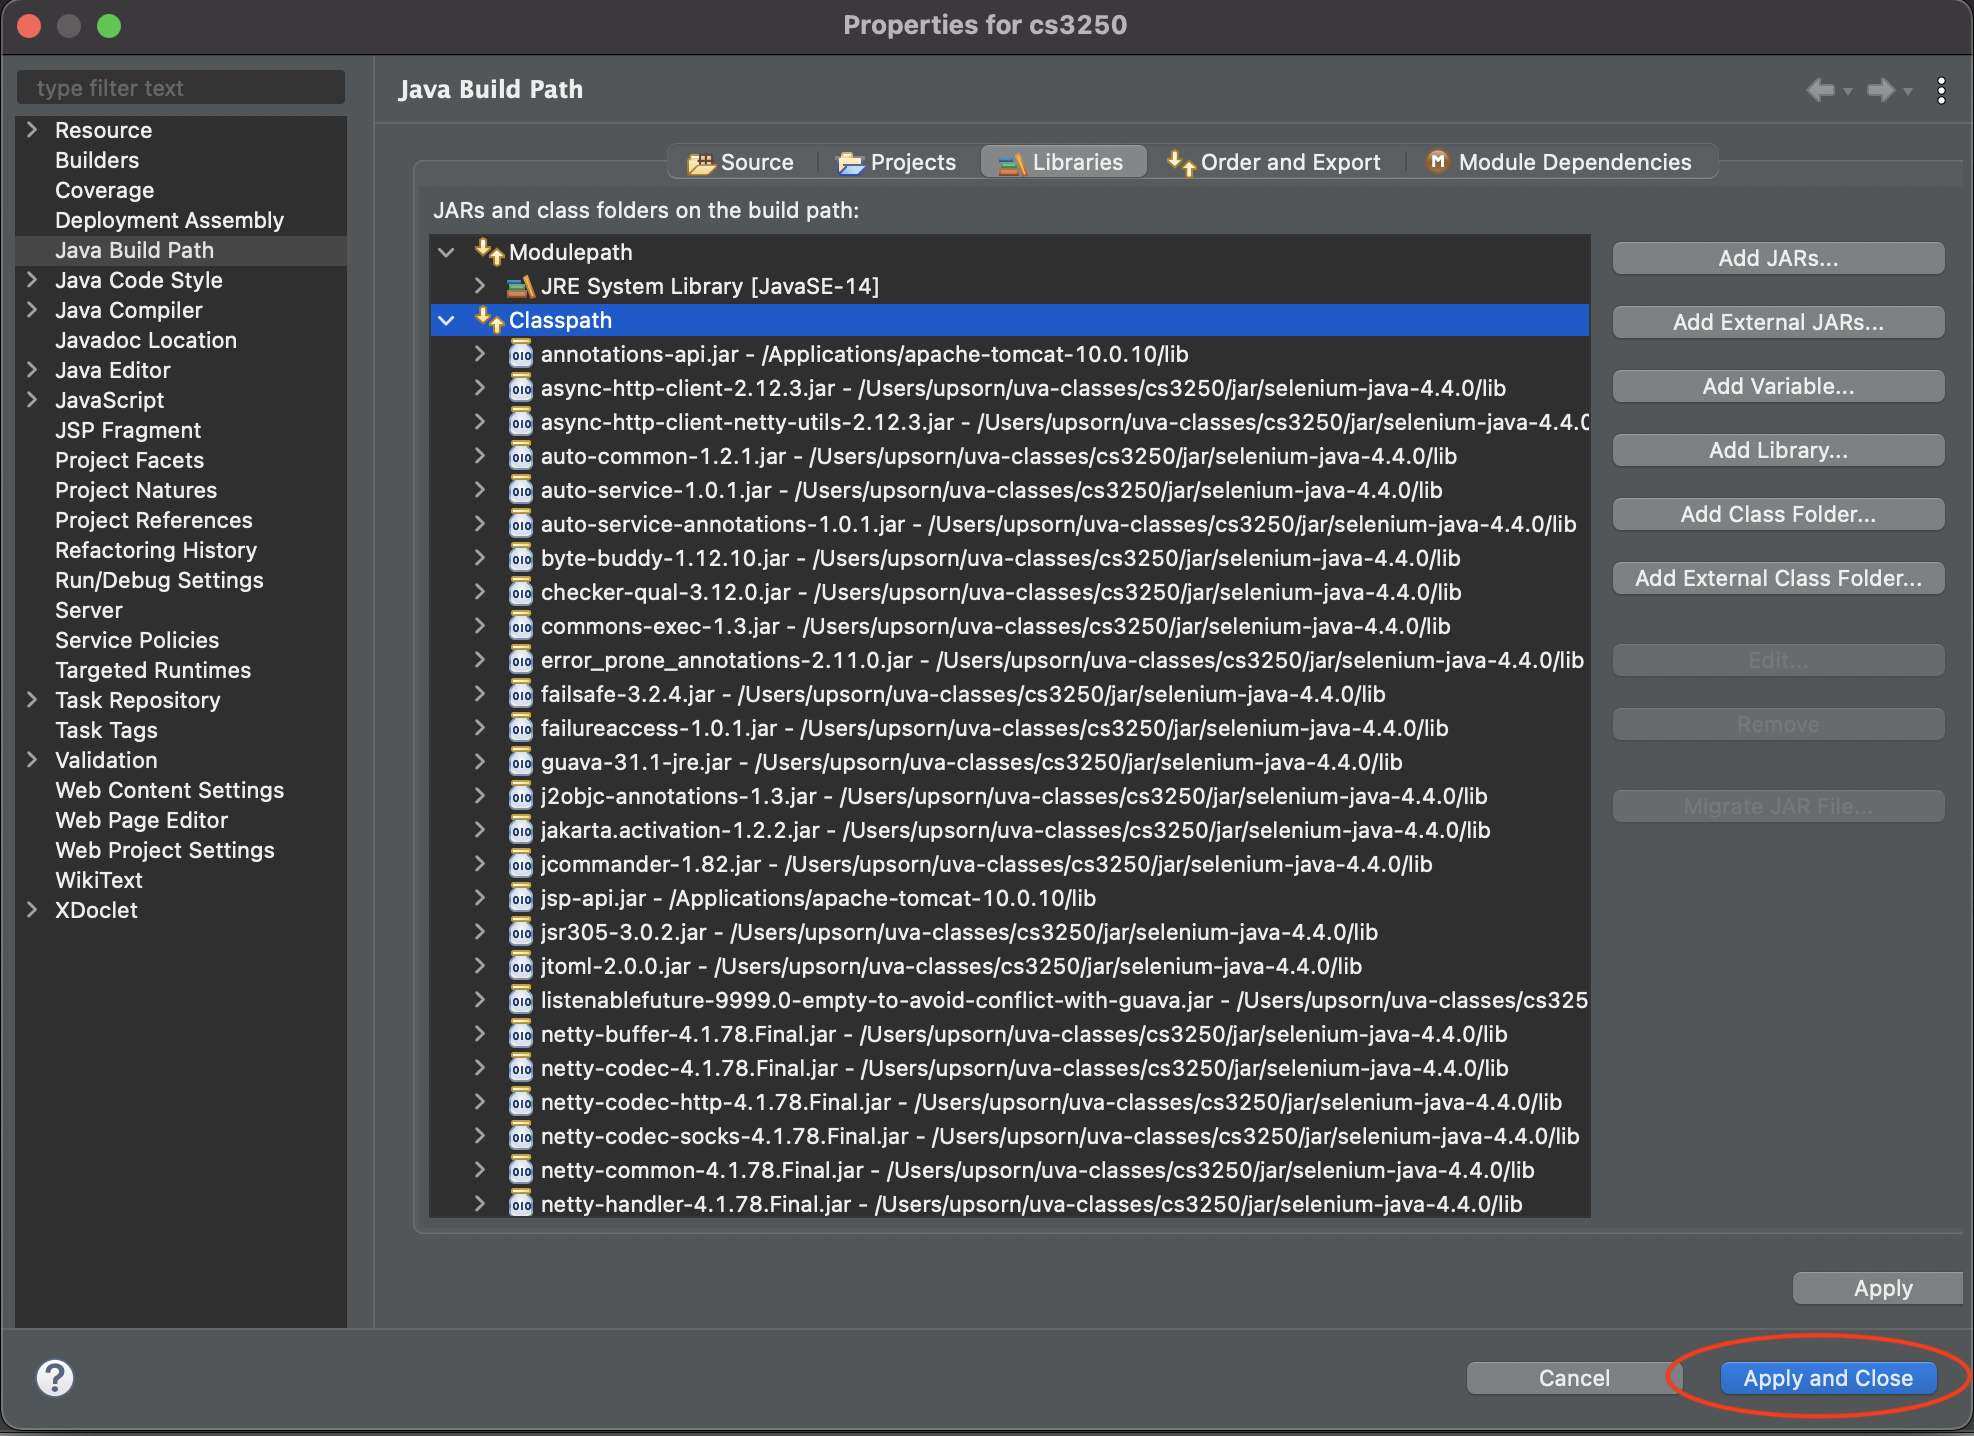
Be sure to add all
.jarfiles. -
Repeat the same process (previous step).
Navigate to your extracted Selenium folder.
Open the
libfolder, select all.jarfiles and add them to the classpath. You classpath should show all the.jarfiles. Be sure to clickApply and Closebutton.Be sure to add all
.jarfiles.
Create a Selenium test
- Open the JUnit test file you created previously
- Add the following code to import
WebDriverimport org.openqa.selenium.WebDriver;
- Add the following code to import Selenium browser driver
import org.openqa.selenium.chrome.ChromeDriver;       // for chrome
import org.openqa.selenium.firefox.FirefoxDriver;     // for Firefox
- Assuming your test file is named "FirstSeleniumTest"
(i.e., the "FirstSeleniumTest" class),
replace the template code created by Eclipse with the following code,
assuming Chrome is used.
Be sure to replace
path/to/chromedriverwith the actual path to yourchromedriver.class FirstSeleniumTest { private WebDriver driver; private String url = "http://www.google.com"; @BeforeEach void setUp() throws Exception { // configure path to the driver System.setProperty("webdriver.chrome.driver", "path/to/chromedriver"); // create an instance of the web browser and open it driver = new ChromeDriver(); // open the given url driver.get(url); } @AfterEach void tearDown() throws Exception { // close the browser driver.close(); } @Test public void test_openURL() { // check if we are on the right page assertEquals(driver.getTitle(), "Google"); } }If you use Firefox, use the following
setUp()and replacepath/to/geckodriverwith the actual path to yourgeckodriver.@BeforeEach void setUp() throws Exception { // configure path to the driver System.setProperty("webdriver.gecko.driver", "path/to/geckodriver"); // create an instance of the web browser and open it driver = new FirefoxDriver(); // open the given url driver.get(url); }
Run a Selenium test
Click the file name, then select Run as > JUnit Test
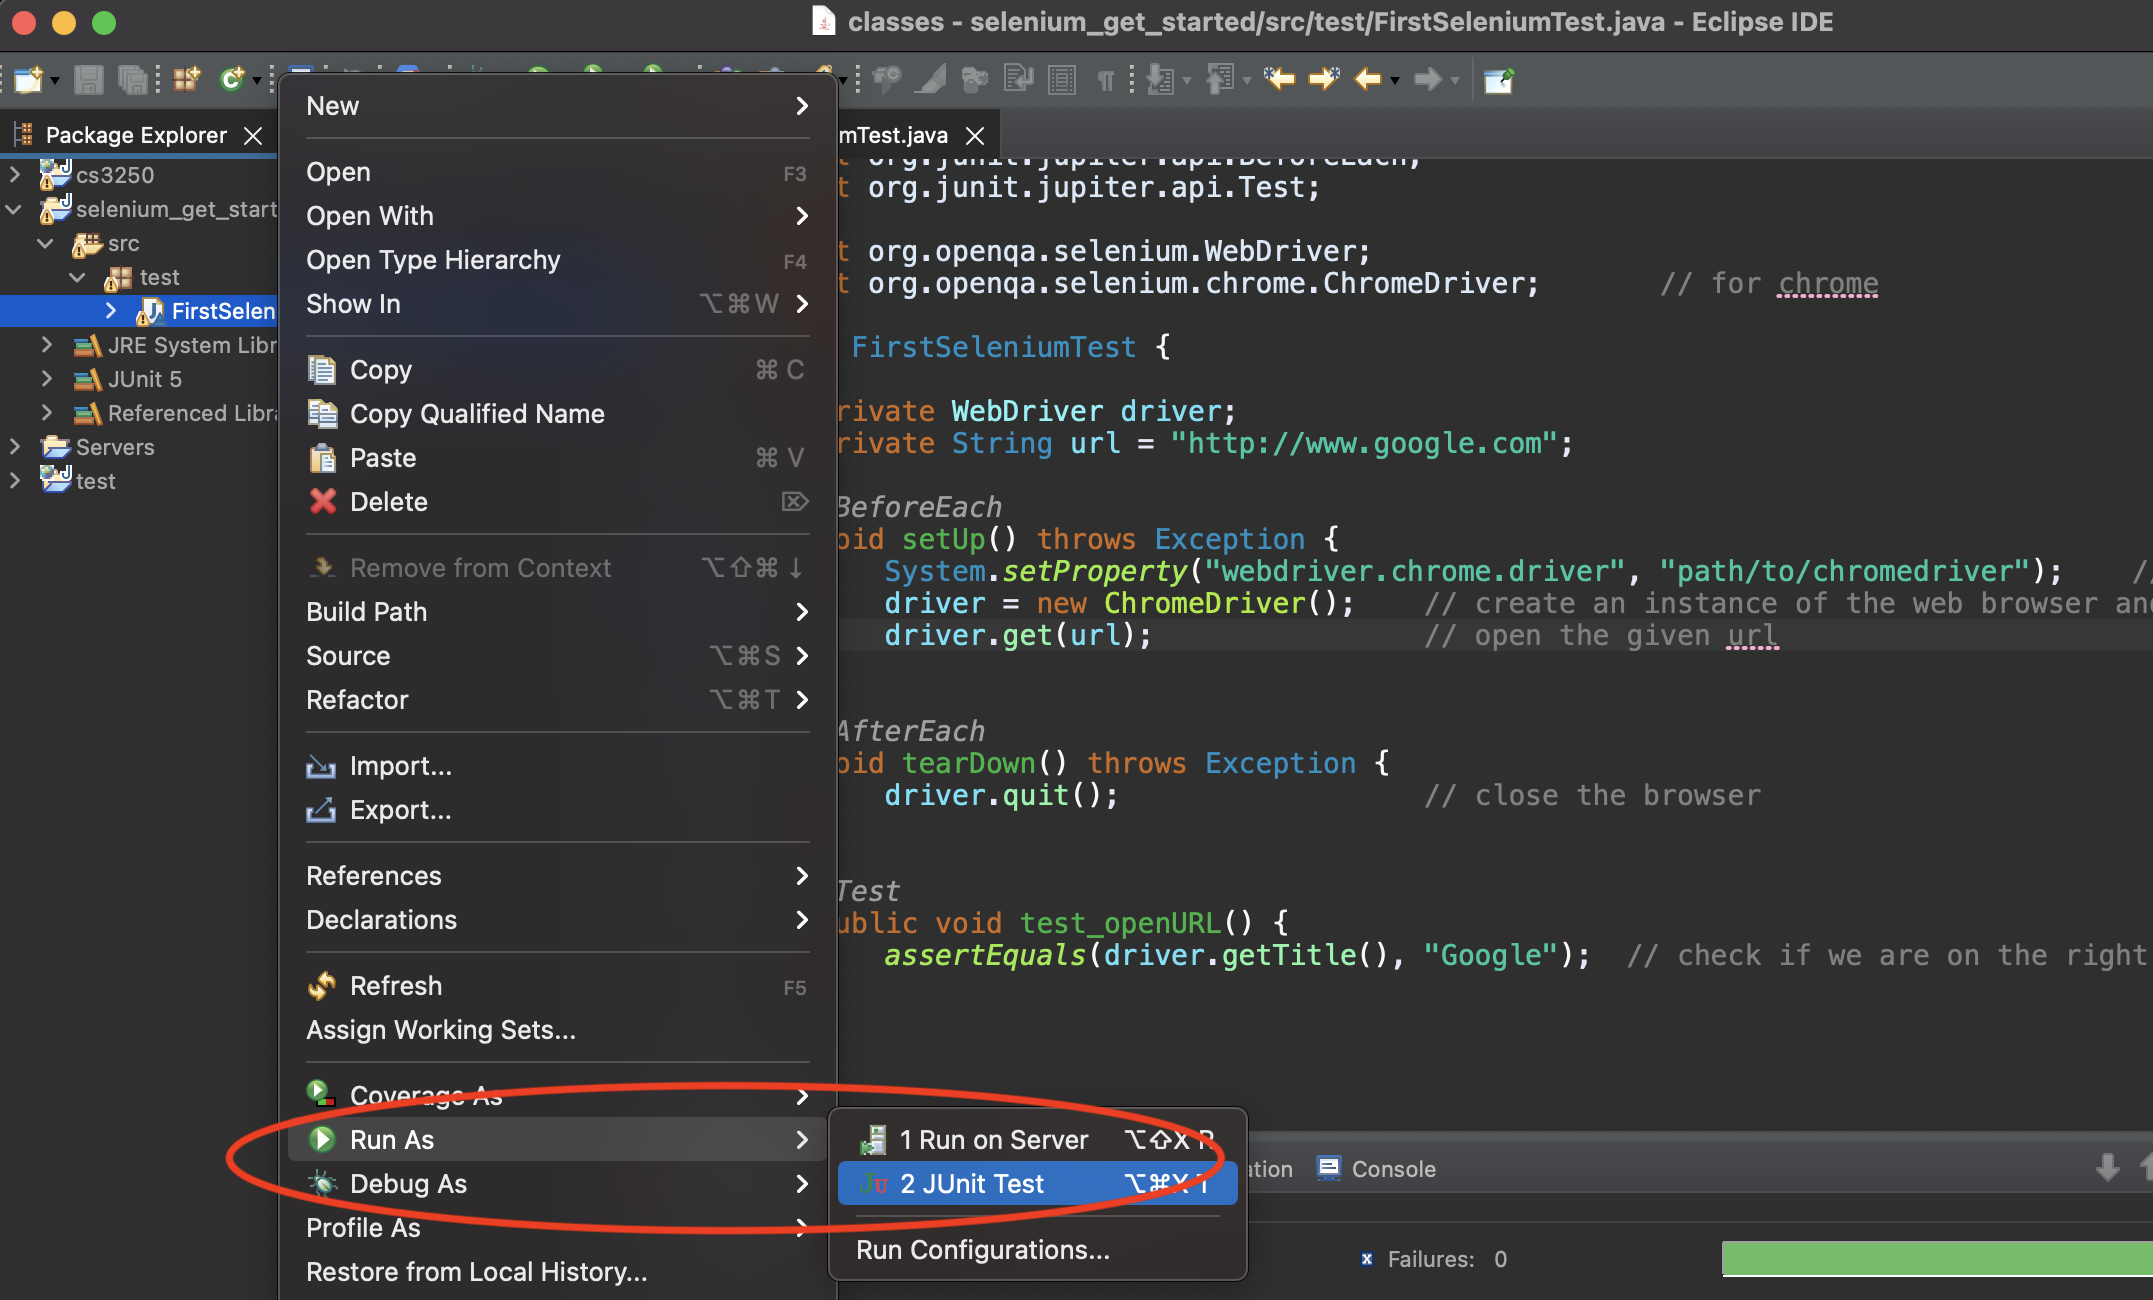
Alternatively, you may use the Toolbar, run icon
(![]() )
)
If everything is set up properly,
you should see a web browser open and close. The test should pass.

(Some) Troubleshooting
- If compilation errors occur, please verify your
Java Build Pathand the path to your web browser driver. - If compilation errors occur and your
Java Build Pathare set properly, try to locatemodule-info.javain yoursrcfolder and delete it. - If runtime errors occur, please verify your
Java Build Path. Be sure to include all.jarfiles provided by Selenium 4. - For Mac users, if you receive a message saying that your browser driver cannot be verified
and thus it cannot be opened
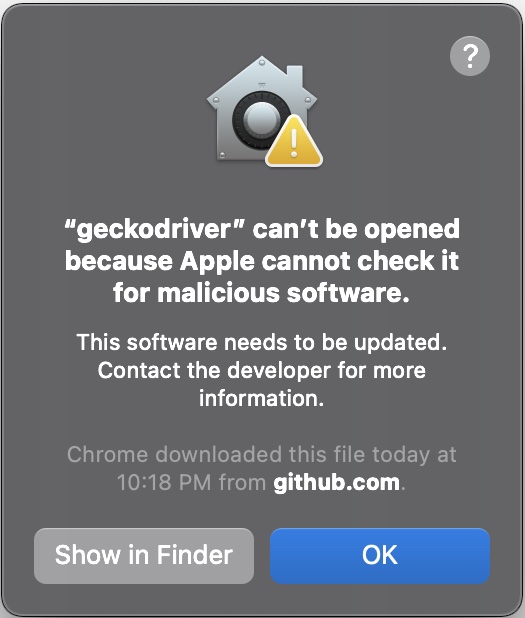
Try to allow it through
System Preferences > Security & Security. For more information, please refer to https://support.apple.com/en-us/HT202491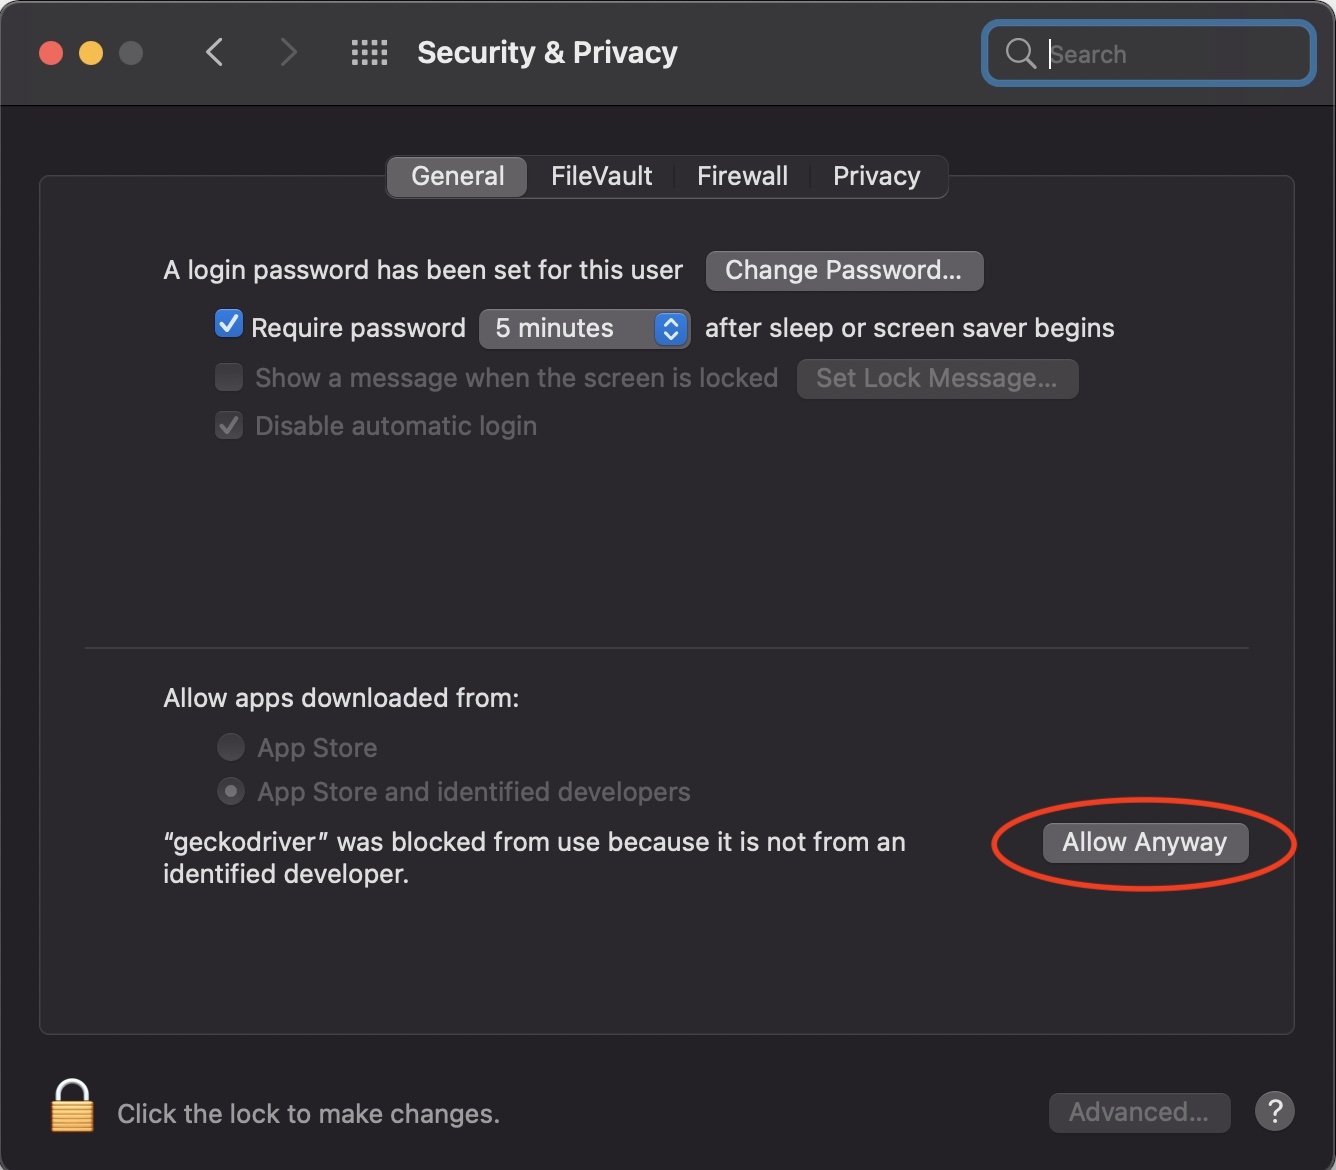
- If you receive a
SessionNotCreatedException, it is most likely that your Selenium's browser driver does not support the version of your web browser.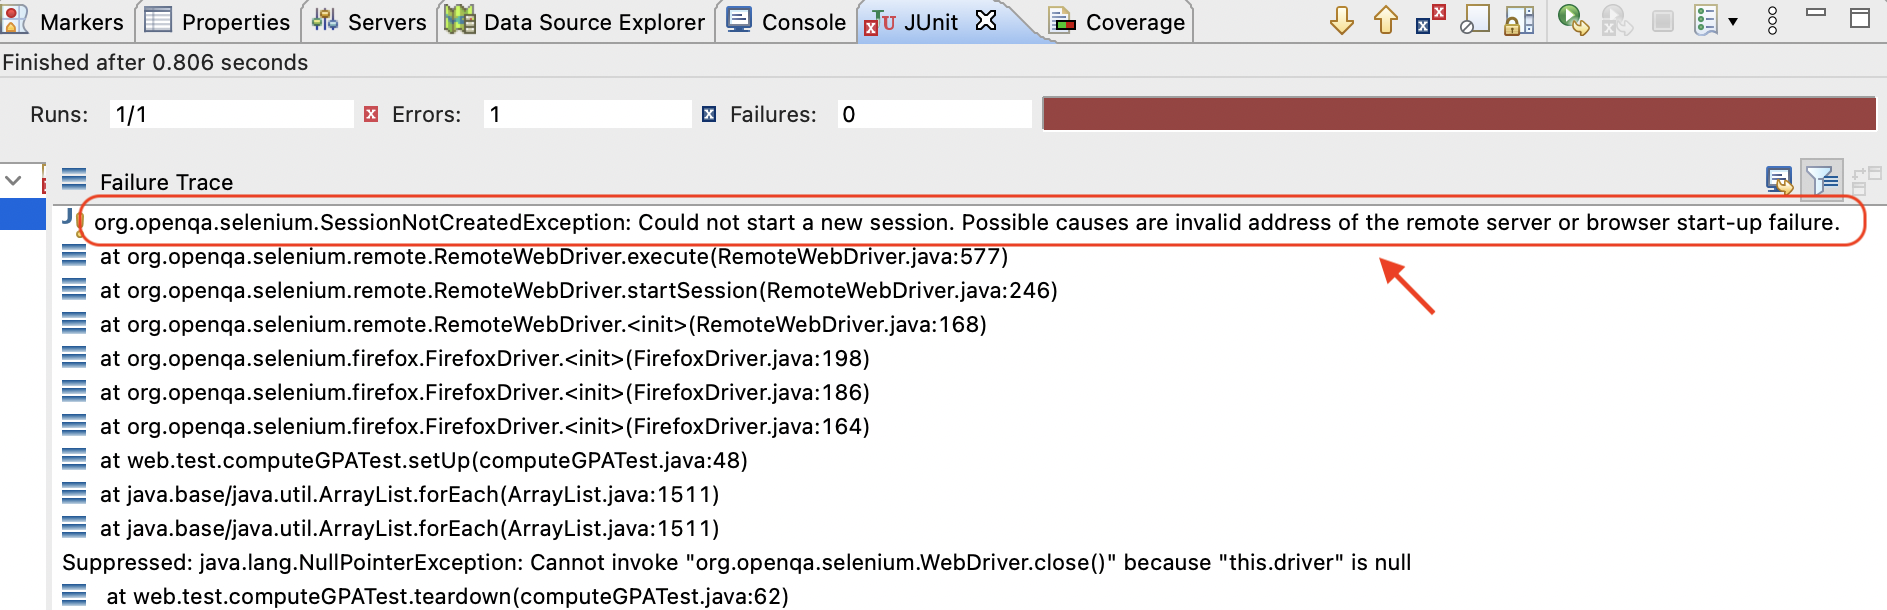
Please check the version of your web browser and then re-download the Selenium's browser driver that supports the version of your web browser.
- For Windows users, if a browser driver cannot be found,
please check your path to the browser driver and include the file extension.
For example,
"C:\\HumptyDumpty\\uva-classes\\cs3250\\jar\\chromedriver.exe" - For Mac users, if a browser driver cannot be found,
please check your path to the browser driver. Do not include the file extension.
For example,
"/Users/HumptyDumpty/uva-classes/cs3250/jar/chromedriver"
Released under the
 CC-BY-NC-SA 4.0 license.
Last updated 2024-01-04 23:41